In this article and video, I have tried to answer the question “How to Read P&ID”.
Reading P&ID is difficult for those who start their careers in Oil &Gas and similar Chemical Process Industries. Here, I have tried to explain P&ID and PEFS in an easy way.
The piping and instrumentation diagram is also known as the Process engineering flow scheme, PEFS.
You will learn how to read P&ID and PEFS with the help of the actual plant drawing. P&ID is more complex than PFD and includes lots of details. A link to download this P&ID is given at the end of the page.
Watch the video as it has step-by-step line tracing to understand the topic better.
What is P&ID?
P&ID is a graphical representation of the actual process plant using various symbols that represent actual equipment. As said earlier, it is more complex than PFD. A single PFD can have multiple P&IDs. This means if some system is shown on a single PFD, it may require multiple P&ID sheets to show the same system on P&ID.
It is one of the main deliverables of FEED. That is front-end engineering and design. It is used during the entire life cycle of the plant. That means during pre-EPC, EPC, and operation.
Use of P&ID/PEFS During Pre- EPC Phase
P&ID is used to derive the Project capital cost estimates. It is also used to develop EPC contract specifications. Plot plant is developed considering various inputs from P&ID and physical site location.
Use of P&ID/PEFS during the EPC phase
During the EPC phase, P&ID is used to develop the individual unit layout. It is used to identify hazardous areas classification, and preparing data sheets of equipment, valves, and instrument.
P&ID is used to develop the piping layout and prepare bulk material take-off for piping, electrical, instrumentation, and civil. It is a key document for various reviews such as HAZOP, SIL, and operability.
During Operation, you have to maintain P&ID in such a condition that it will show actual plant conditions at any time. It should be updated when any physical change is made so that the unit will remain compliant with codes, standards, and specifications, and can be operated safely under the defined process conditions.
P&IDs are used to train operators and engineers before they start work in the plant.
What information does P&ID provide?
- All the equipment, including installed spares and associated piping, including drain and vent line.
- Insulation or jacketing requirements.
- Instrumentation
- Heat tracing and insulation detail
- Information about utilities
- Piping components, including their size, class, and tag Number
- Information required for design, construction, and operation, such as
- A slope of the line
- Minimum and maximum distance from the equipment or instruments
- Minimum straight lengths after instruments
P&ID Quiz – Test yourself, Take This Quiz
Unlock New Skills with Our Best Selling Online Courses
What is not included in a P&ID?
- Process conditions and physical data
- Operating conditions
- Streamflow details
- Equipment locations
- Pipe routing, length, and fittings
- Support and structural details are also not included in p&id
Ok, now you know what P&ID is and the types of information you’re going to get from the drawing. Let’s confirm this with the help of actual P&ID.
How to Read the Process Flow Diagram (PFD)
This is a PFD of the flushing oil system that shows the entire system of pump seal flushing oil. This is the simplest system with just one cone roof tank and two centrifugal pumps. The pump used in a heavier product such as crude, fuel oil required flushing oil to keep the pump seal clean. Here Ultra-low sulfur diesel is used as flushing oil.
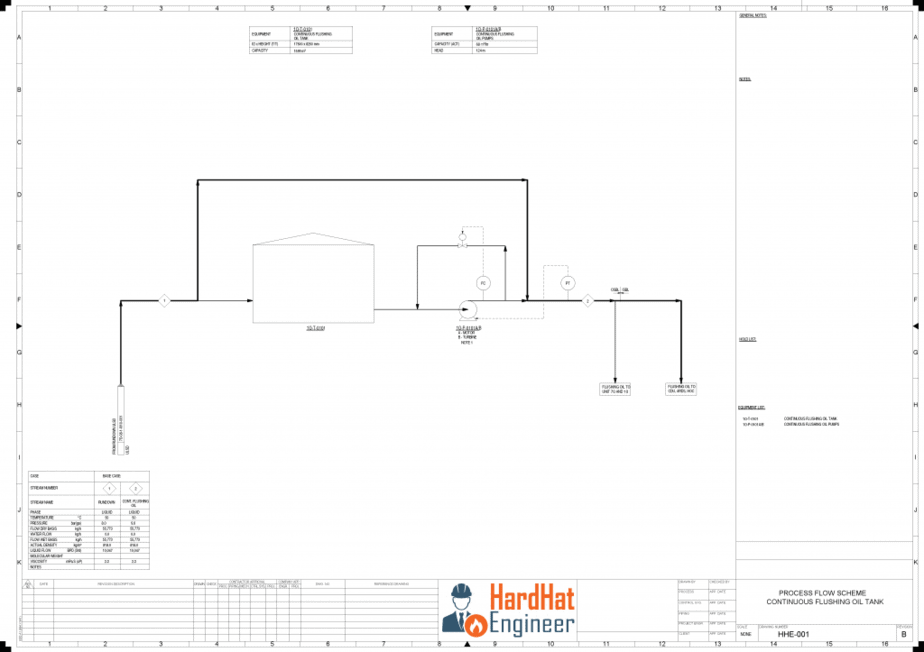
You can see here that ULSD is coming from the diesel rundown line to the tank, and with the help of the pump, it is supplied to the various pump of ISBL and OSBL units’.
I hope the function of the system is clear to you. Now let’s move to P&ID.
There are two P&IDs for the OSBL part of this system and many more for ISBL parts. I will explain to you the OSBL part of the system.
How to Read P&ID Symbols
Reading P&ID is nothing but the reading of symbols. So, if you have not seen the earlier videos on P&ID symbols and how to read PFD, it will be difficult for you to understand this drawing. You can watch these videos.
How to Read P&ID
If possible, get a print of this P&ID in A3 and follow the video. You can download this P&ID the link is given at the end of the article.
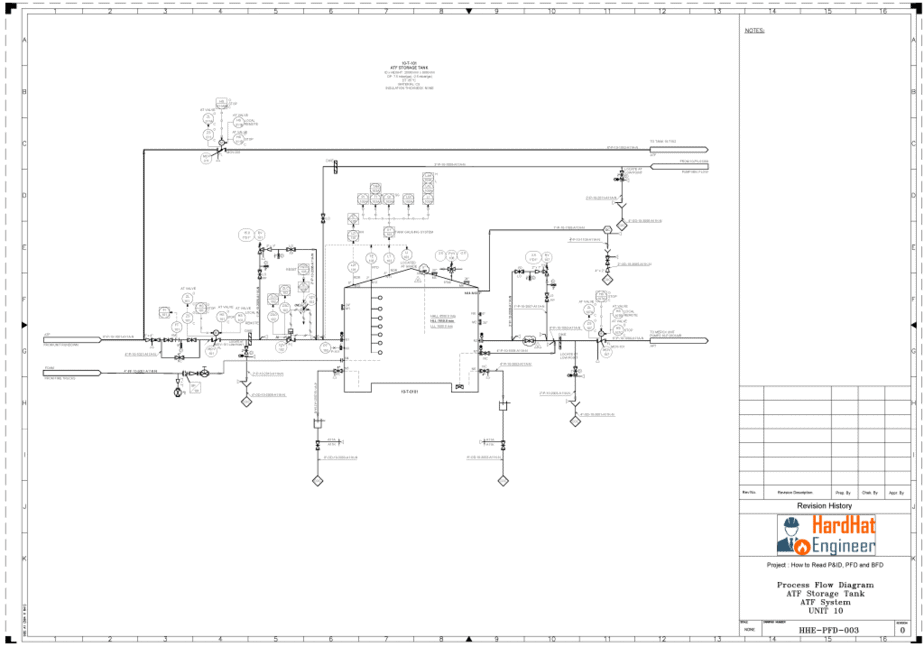
It is always a good practice to start reading P&ID from the main incoming lines and follow the fluid path.
Line Tracing – Main Incoming Line
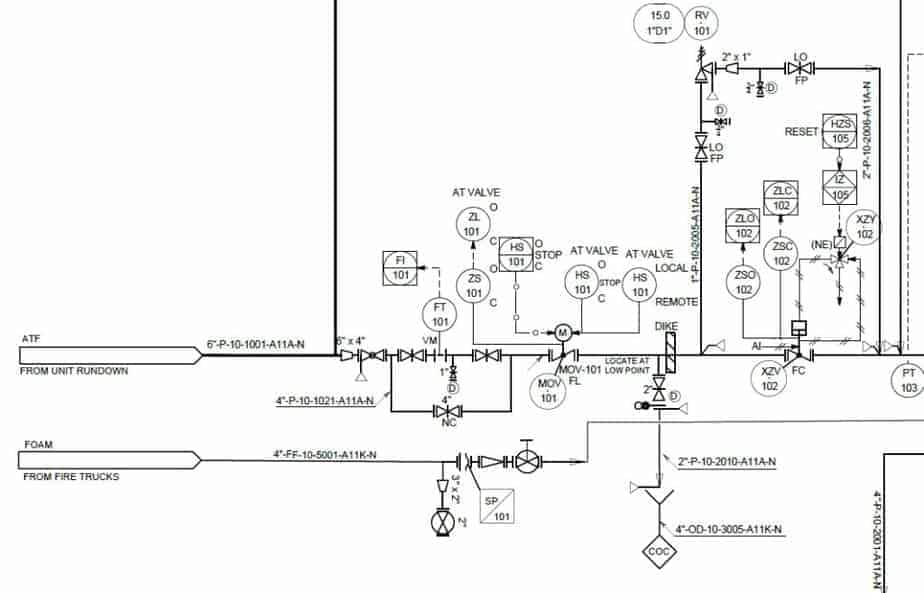
Here ATF is coming from CDU; you can see that. Remember the blackhead on the arrow? You have learned this in how to read the PFD video. It means Diesel is coming from a different unit. Here you can see the line number. It is a 150 mm diameter line per DN standard equivalent to 6” NPS.
The different company follows different terminology for the line number. But it contains the same information such as line size, unit number, commodity code that identifies fluid inside the line, circuit number, line sequence number, piping class that gives all detail about piping components and their materials, insulation, and coating requirement.
Here N means there is no insulation. If there is H, then hot insulation, C is for cold insulation, A for acoustic reduction, P for personal protection, and F for fireproofing. It also gives information about whether the line is a steam trace or an electric trace. Normally ET is used for electric tracing, and ST is used for steam tracing.
Let’s move ahead; here, you can see that the diesel line is divided into two strim. We follow this strim. 6” line is getting reduced to 4”. Don’t get confused with the reducer symbol; it is just an indication of line size change. In piping, it can be a reducing tee as it is a 6” to 4” concentric reduction.
Now, this triangle with a line indicates a line break. A line break is the demarcation of the line number change. So, whenever this symbol is used, it indicates that from that point onward line number is different.
This is the bypass loop for the flow transmitter. You can see that the venturi-type flow transmitter is provided in between the two gate valves. Why did I say it is a venture-type flow transmitter? Letters VM indicates the type of flow transmitter. It gives flow indication on the control plane. You can see the connection shown between FT and FI.
From the piping point of view, you can see a 25 mm drain valve in between the two gate valves. The letter D indicates that it is a drain valve; if it is V, it is a vent valve. Of course, if it is a vent, it shows on the topside, not on the bottom. The bypass valve is also a gate valve that will remain closed during normal operation. You can see the letters NC which indicates the same.
MOV Symbols
Reading P&ID is nothing but reading P&ID symbols. So, if you are aware of symbols, you can easily understand the P&ID. Here you can see the motor-operated butterfly valve. Lots of instruments are shown here. But it is not that complicated. If you are aware of MOV, you know that it can be operated locally or from the control penal. You can read the AT VALVE label, which means this instrument function is available on the valve itself.
HS indicates hand switch; with these switches, you can put MOV on a manual or remote control, which means on panel control. You can also start or stop the valve from the field. HS-O means open, and HS-C means close. The data link indicates this valve is connected to the control panel.
The last two instrument bubbles show the potions of the valve. From the field, you can set and see the % of the valve opening.
Unlock New Skills with Our Best Selling Online Courses
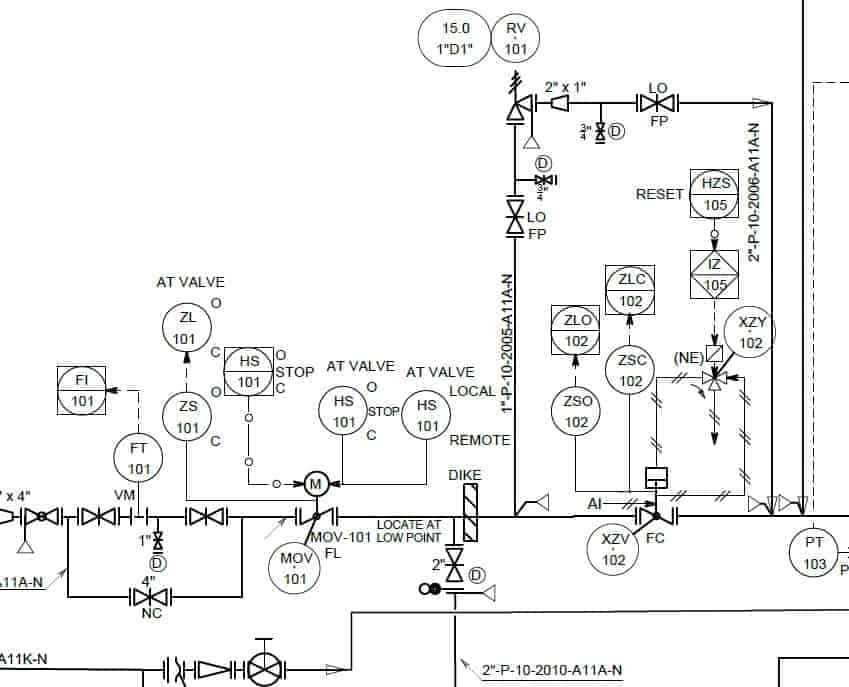
Next is a drain valve that is located at the lowest point. This is the spectacle blind with a normally closed configuration. If the dark ring is towards the valve, as in this case, it indicates that solid ring covers and isolates the joint during normal operation.
If the only circle is towards the valve, as shown here, that means the hollow ring is there, and the line is live during the normal operation.
Below the drain valve, the funnel is shown. So, when you drain ATF, it will go to the COC system. COC means continuous oil-contaminated that is used to drain hydrocarbon. The second type of drain is AOC which means an accidentally oil-contaminated system.
After a dike wall, there is a pneumatically controlled globe valve is there. You can see the pneumatic line symbol. Like MOV, the pneumatic valve also has various switches to operate the valve locally and from the control panel. You can also see the three-way valve connected to the pneumatic line to operate the actuator.
You can refer to the abbreviation table to understand the meaning of all these instrument bubbles. I have attached this table with a free download.
You can see that there is a relief valve in the bypass. It is used to protect the actuator from the surge.
P&ID Abbreviation Table
| FIRST LETTERS | SUCCEEDING LETTERS | ||||
|---|---|---|---|---|---|
| MEASURED / INITIATING VARIABLE | DESCRIPTION | VARIABLE MODIFIER | READOUT / PASSIVE FUNCTION | OUTPUT / ACTIVE FUNCTION | FUNCTION MODIFIER |
| A | ANALYSIS | ALARM | |||
| B | BURNER, COMBUSTION | USER’S CHOICE | USER’S CHOICE | USER’S CHOICE | |
| C | CONDUCTIVITY | CONTROL | CLOSE | ||
| D | DENSITY | DIFFERENCE, DIFFERENTIAL | DEVIATION | ||
| E | VOLTAGE | SENSOR, PRIMARY ELEMENT | |||
| F | FLOW, FLOW RATE | RATIO | |||
| G | USER’S CHOICE | GLASS, GAUGE, VIEWING DEVICE | |||
| H | HAND | HIGH | |||
| I | CURRENT | INDICATE | |||
| J | POWER | SCAN | |||
| K | TIME, SCHEDULE | TIME RATE OF CHANGE | CONTROL STATION | ||
| L | LEVEL | LIGHT | STATUS | LOW | |
| M | MOISTURE, MANUAL, MULTI, MOTOR | OVERRIDE | MIDDLE, INTERMEDIATE | ||
| N | USER’S CHOICE | USER’S CHOICE | USER’S CHOICE | USER’S CHOICE | |
| O | USER’S CHOICE | ORIFICE | OPEN | ||
| P | PRESSURE, VACUUM | POINT (TEST CONNECTION) | |||
| Q | QUANTITY | INTEGRATE, TOTALIZE | INTEGRATE, TOTALIZE | ||
| R | RADIATION, RESTRICTION | RECORD | RUN | ||
| S | SPEED, FREQUENCY | SAFETY | SWITCH | STOP | |
| T | TEMPERATURE | TRANSMIT | |||
| U | MULTI-VARIABLE | MULTIFUNCTION | MULTIFUNCTION | ||
| V | VIBRATION, MECHANICAL ANALYSIS | VALVE, DAMPER, LOUVER | |||
| W | WEIGHT, FORCE | WELL, PROBE | |||
| X | UNCLASSIFIED, MISCELLANEOUS | X-AXIS | ACCESSORY DEVICES, UNCLASSIFIED | UNCLASSIFIED | UNCLASSIFIED |
| Y | EVENT, STATE, PRESENCE | Y-AXIS | RELAY, COMPUTING DEVICE | ||
| Z | POSITION, DIMENSION | Z-AXIS, SAFETY INSTRUMENTED SYSTEM | DRIVER, ACTUATOR, UNCLASSIFIED FINAL CONTROL ELEMENT | ||
| TYPICAL BASIC PROCESS CONTROL SYSTEM ABBREVIATIONS | |||
|---|---|---|---|
| AE | ELEMENT – ANALYZER | PV | VALVE – CONTROL, PRESSURE |
| BE | ELEMENT – BURNER | PCV | VALVE – SELF REGULATING |
| DT | TRANSMITTER – DENSITY | PG | GAUGE – PRESSURE |
| EIV | EMERGENCY ISOLATION VALVE | PT | TRANSMITTER – PRESSURE |
| FV | VALVE – CONTROL | SC | CONTROLLER – LOCAL SPEED |
| FE | ELEMENT – FLOW | TV | VALVE – CONTROL, TEMPERATURE |
| FFC | CONTROLLER – FLOW RATIO | TG | GAUGE – TEMPERATURE |
| GB | STATUS INDICATION | TE | ELEMENT – TEMPERATURE |
| HS | SWITCH – HAND | VE | PROBE – VIBRATION |
| HV | VALVE – CONTROL, HAND | VS | SWITCH – VIBRATION |
| I | FUNCTION – DCS LOGIC | VT | TRANSMITTER – VIBRATION |
| IT | TRANSMITTER – CURRENT | WT | TRANSMITTER – WEIGH SCALE |
| JT | TRANSMITTER – POWER | XV | VALVE – ON/OFF |
| KS | SWITCH – TIME | XY | SOLENOID VALVE |
| LG | GAUGE – LEVEL | ZSC | SWITCH – POSITION CLOSED |
| LV | VALVE – CONTROL, LEVEL | ZSO | SWITCH – POSITION OPEN |
| MOV | VALVE – MOTOR OPERATED | ||
| TYPICAL INSTRUMENTED PROTECTIVE SYSTEM / FIRE & GAS SYSTEM ABBREVIATIONS | |||
| FZS | SWITCH – FLOW, SAFETY | RV | VALVE – PRESSURE RELIEF, SAFETY |
| FZT | XMTR – DP, SAFETY | TZS | SWTICH – TEMPERATURE, SAFETY |
| HZS | SWITCH – HAND, SAFETY | TZT | TRANSMITTER – TEMPERATURE, SAFETY |
| IZ | FUNCTION – IPF LOGIC, SAFETY | XZV | VALVE – SHUTDOWN, SAFETY |
| LZS | SWITCH – LEVEL, SAFETY | XZY | POSITIONER – HART, SAFETY |
| LZT | TRANSMITTER – LEVEL, SAFETY | XZY | SOLENOID VALVE – SHUTDOWN, SAFETY |
| PDZT | TRANSMITTER – DP, SAFETY | ZZSC | SWITCH – POSITION CLOSED, SAFETY |
| PSE | BURSTING DISK, SAFETY | ZZSO | SWITCH – POSITION OPEN, SAFETY |
| PZS | SW – PRESSURE, SAFETY | ZZT | TRANSMITTER – POSITION, SAFETY |
| PZT | TRANSMITTER – PRESSURE, SAFETY | ||
Main Equipment – Tank
Next is a tank. First, I will explain mechanical parts and then instrumentation. As you can see, this is a fixed roof tank. On top of the P&ID, you can see the detail of each of the equipment shown in the drawing. Let’s see the detail of this tank.
The tank is 17.5 meters in height with an 8.25-meter diameter. You can also see the operating pressure and temperature of the tank. The material of construction is carbon steel, and there is no insulation. Now let’s go back to the tank.
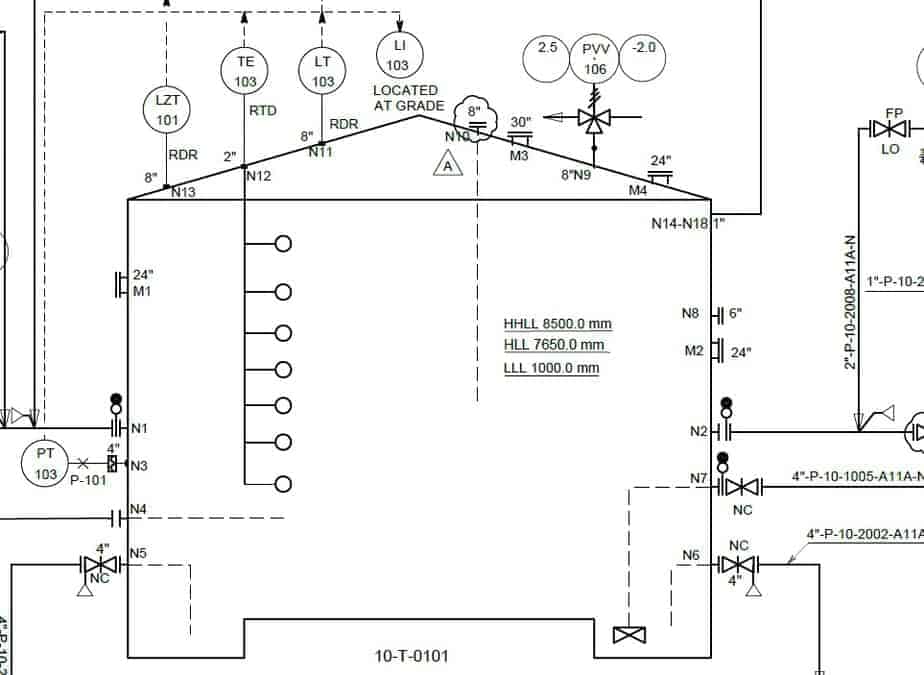
N1 to N17 are nozzle numbers. P&ID doesn’t show the nozzle’s exact location but the size of the nozzle. Manholes are shown as M1 to M3. The broken line shows the internal piping. There is a vortex breaker with the N8 nozzle connected to a pump suction line with a Normally Closed gate valve. This is because the main suction line is N2. N8 will use only when you want to drain the tank completely.
Two more nozzles, N9 and N10, are used to drain the tank to COC. These open types of liquid seals prevent air ingress into the tank.
Now let’s check the instrumentation. To safely operate any equipment, you must monitor pressure, temperature, and level. Here you can see the Pressure Transmitter near the tank bottom plate. On top of the roof, you can see the radar type level indicator and transmitter.
The temperature gauge is shown as TE which is temperature elements. This arrangement shows multiple thermocouples installed at different heights of the tank. This will ensure that you will get an average temperature of the tank as the liquid has a different temperature at a different level.
What is LLL, HLL, and HHLL in Tanks and Equipment?
LZT is a level safety transmitter. Here you can see the value for LLL, HLL, and HHLL. LLL means low liquid level, HLL means high liquid level and HHLL means high high liquid level. LLL protects your pump and when tank level reached to LLL, it gave the alarm in control penal and based on the logic configuration it may trigger to switch off command to the pump.
HLL and HHLL will use to protect the tank from overfilling. When the liquid level reaches the HLL it gives the alarm and when it reaches HHLL it will trigger the safety logic and stop the fluid supply to the tank.
There is a breather valve on the tank. It will protect the tank from overpressure and vacuum.
Now, all instrument bubbles are sending the information to the local and main control panel for the pressure, level, and temperature instrument that I have explained to you. You may have noticed that a tank gauging system receives all input signals from the instruments.
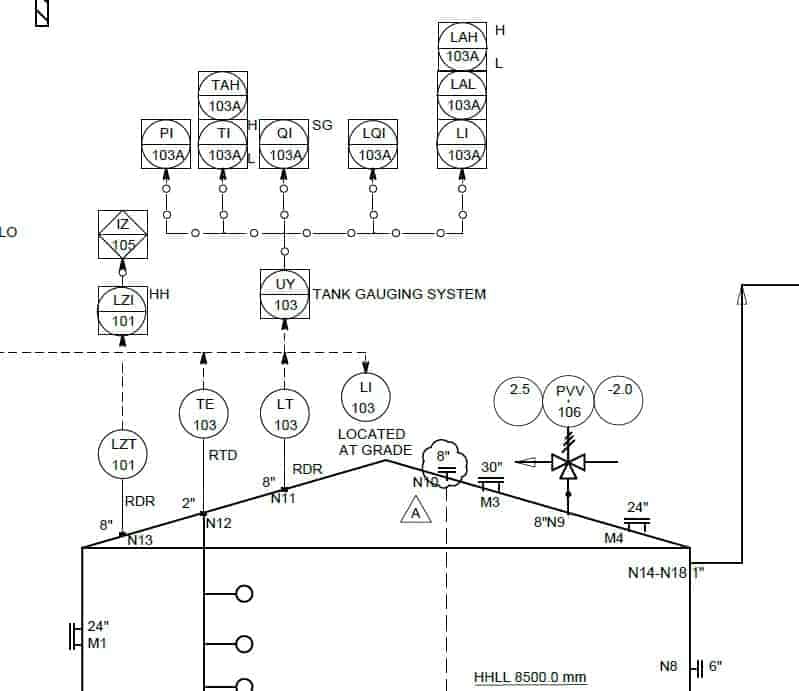
The tank gauging system is used to calculate the quantity of liquid stored in the tank at any given time. Based on the diameter, level, and temperature it will calculate the quantity of the liquid stored in the tank. QI is a quantity indicator.
In the last part of this video, let’s check what is going out of the tank. AFT from the tank is supplied to the pump with the help of 150 mm pipeline. You can see that inside dike there is a manual gate valve with a bypass arrangement. There is a safety relief valve on the bypass.
Outside the dike, you can see the motor-operated butterfly valve. This MOV has similar switches that I have explained to you earlier to operate the valve locally and from the control panel.
If you know the instrument legends and symbols, you can read and understand any P&ID.
Please, Don’t forget to Subscribe.
Are You Piping Components Master?
