ASTM A53 is one of the most widely used material standards for Steel pipes that are used in the Oil and Gas and other process industries. Grade B of ASTM A 53 is more popular than other grades. These pipes can be bare pipes without any coating, or they may be Hot-Dipped or Zinc-Coated and manufactured by Welding or by a Seamless manufacturing process.
In Oil and Gas, A53 grade pipes are used in structural and non-critical applications. They are not used in hydrocarbon services or any high pressure and temperature services.
Pipe Size and Types Covered in ASTM A53
Pipe sizes NPS 1/8” to NPS 26” are covered in this standard. This is equivalent to DN 6 to DN 650.
There are three types of pipes covered in this standard.
- Type F – Furnace-butt welded continuous Welded Pipe.
- Grade A
Type F Garde A type pipe is made by continuous coil, and the longitudinal joint is welded by forge welding. In this process, sets of rollers are used that create mechanical pressure to join the heated ends of the coil.
- Type E – Electric Resistance Welded Pipe.
- Grade A
- Grade B
Garde A and Garde B pipes of Type E are made by continuous coil, and the longitudinal joint is welded by heat produced due to electric resistance between opposite ends of the pipe. In this process also, a set of rollers are used to join heated ends. The weld seam of Grade Bpipes is heat-treated after welding to a minimum of 540°C.
- Type S – Seamless Pipe
- Grade A
- Grade B
Type S types of pipes are manufactured using the extrusion method.
Raw steel used to manufacture pipes is produced by open-hearth, electric furnace, or basic-oxygen method.
Chemical Composition and Mechanical Properties of ASTM A53 Pipes
Iron is the main element in the A53 pipe. Other elements such as Carbon, Manganese, Phosphorus, Sulfur, Copper, Nickel, Chromium, Molybdenum, and Vanadium are also available in small quantities. See the table below for the Type -E, F, and S Chemical Composition.
| Type | E and S | E and S | F |
|---|---|---|---|
| Grade | A | B | A |
| Carbon | 0.25 | 0.3 | 0.3 |
| Manganese | 0.95 | 1.2 | 1.2 |
| Phosphorus | 0.05 | 0.05 | 0.05 |
| Sulfur | 0.45 | 0.45 | 0.45 |
| Copper* | 0.4 | 0.4 | 0.4 |
| Nickel* | 0.4 | 0.4 | 0.4 |
| Chromium* | 0.4 | 0.4 | 0.4 |
| Molybdenum* | 0.15 | 0.5 | 0.5 |
| Vanadium* | 0.08 | 0.08 | 0.08 |
| * The sum of these five elements must be less than 1.00 %. | |||
Piping Component Quiz – Test yourself, Take This Quiz
Unlock New Skills with Our Best Selling Online Courses
Mechanical Properties of ASTM A53
Minimum acceptable values for Tensile strength and Yield strength in Mpa for the mechanical test of ASTM A53 Pipes are listed below.
| Types and Grades | Tensile Strength -Mpa | Yield Strength – Mpa |
|---|---|---|
| Type E and S – Grade A | 330 | 205 |
| Type E and S – Grade B | 415 | 240 |
| Type F – Grade A | 330 | 205 |
Inspection and testing of Pipe
During the inspection of the pipe, you have to perform the following test on the pipe to check the quality of the final product.
- Chemical Analysis of the final product. The number of tests – 2 Pipes per lot of 500 or 2 Pipes per heat Number. If either pipe fails- two more pipes shall be tested from the same lot.
- Tensile Test – This test is performed to check the mechanical properties of the pipe. For the welded pipe, the strength of the weld should not be less than the strength of the pipe body.
- Bending Test – For pipe size, NPS 2 and smaller bending test is performed to check the ductility of the pipe. Bend test can be 90 Degree or 180 Degree, depending on the requirement.
- Flattening Test – Pipe size over NPS 2 is tested for ductility by flattening test. A sample from the pipe is cut and placed between two flat surfaces and flattened as specified in ASTM A53.
- Hydrotest – This test is performed on each length of the pipe to check the leak. Pressure shall be held for 5 seconds or more.
- Ultrasonic or Electromagnetic Test of weld seam– This non-destructive test is performed on the full length of the weld to check the soundness of welding.
ASTM A53 Grade A and Grade B Pipe Dimensions

Schedule 40 Pipe Dimensions in MM
| Standard Pipe Schedule 40 – ASTM A53 Grades A and B – dimensions in mm | ||||||
|---|---|---|---|---|---|---|
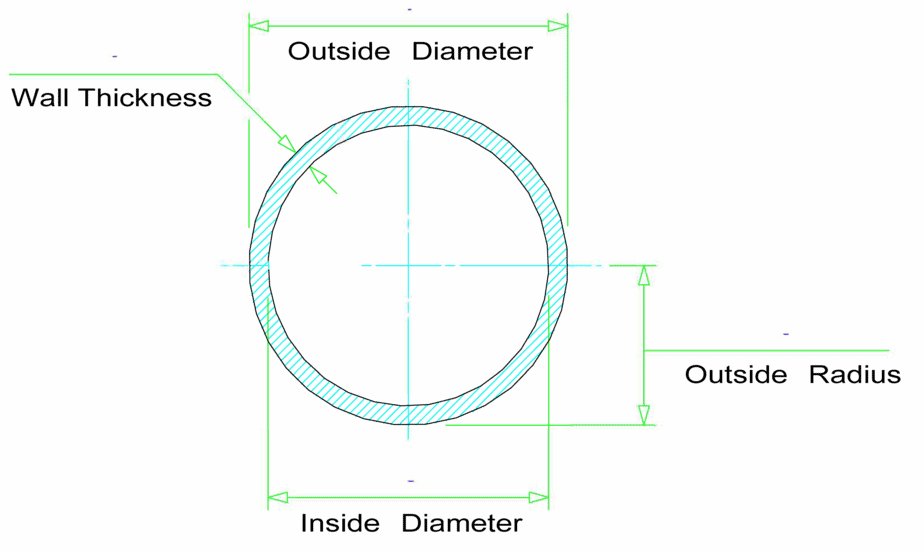
| NPS Designator | DN Designator | Outside Diameter | Inside Diameter | Wall Thickness | Nominal Weight (Mass) per unit Length | |
| (mm) | (mm) | (mm) | Plain End (kg/m) | Threads & Couplings (kg/m | ||
| 1/8″ | 6 | 10.3 | 6.8 | 1.73 | 0.37 | 0.37 |
| 1/4″ | 8 | 13.7 | 9.2 | 2.24 | 0.63 | 0.63 |
| 3/8″ | 10 | 17.1 | 12.5 | 2.31 | 0.84 | 0.84 |
| 1/2″ | 15 | 21.3 | 15.8 | 2.77 | 1.27 | 1.27 |
| 3/4″ | 20 | 26.7 | 20.9 | 2.87 | 1.69 | 1.69 |
| 1″ | 25 | 33.4 | 26.6 | 3.38 | 2.5 | 2.5 |
| 1-1/4″ | 32 | 42.2 | 35.1 | 3.56 | 3.39 | 3.4 |
| 1-1/2″ | 40 | 48.3 | 40.9 | 3.68 | 4.05 | 4.04 |
| 2″ | 50 | 60.3 | 52.5 | 3.91 | 5.44 | 5.46 |
| 2-1/2″ | 65 | 73 | 62.7 | 5.16 | 8.63 | 8.67 |
| 3″ | 80 | 88.9 | 77.9 | 5.49 | 11.29 | 11.35 |
| 3-1/2″ | 90 | 101.6 | 90.1 | 5.74 | 13.57 | 13.71 |
| 4″ | 100 | 114.3 | 102.3 | 6.02 | 16.07 | 16.23 |
| 5″ | 125 | 141.3 | 158.2 | 6.55 | 21.77 | 22.07 |
| 6″ | 150 | 168.3 | 154.1 | 7.11 | 28.26 | 28.58 |
| 8″ | 200 | 219.1 | 202.7 | 8.18 | 42.55 | 43.73 |
| 10″ | 250 | 273 | 254.5 | 9.27 | 60.29 | 63.36 |
| 12″ | 300 | 323.8 | 304.8 | 9.52 | 73.78 | 76.21 |
Schedule 40 Pipe Dimensions in Inches
| NPS Designator | DN Designator | Outside Diameter | Inside Diameter | Wall Thickness | Nominal Weight (Mass) per unit Length | |
|---|---|---|---|---|---|---|
| (Inches) | (Inches) | (Inches) | Plain End (lb/ft) | Threads & Couplings (lb/ft) | ||
| 1/8″ | 6 | 0.405 | 0.269 | 0.068 | 0.24 | 0.25 |
| 1/4″ | 8 | 0.54 | 0.364 | 0.088 | 0.43 | 0.43 |
| 3/8″ | 10 | 0.675 | 0.493 | 0.091 | 0.57 | 0.57 |
| 1/2″ | 15 | 0.84 | 0.622 | 0.109 | 0.85 | 0.86 |
| 3/4″ | 20 | 1.05 | 0.824 | 0.113 | 1.13 | 1.14 |
| 1″ | 25 | 1.315 | 1.049 | 0.133 | 1.68 | 1.69 |
| 1-1/4″ | 32 | 1.66 | 1.38 | 0.14 | 2.27 | 2.28 |
| 1-1/2″ | 40 | 1.9 | 1.61 | 0.145 | 2.72 | 2.74 |
| 2″ | 50 | 2.375 | 2.067 | 0.154 | 3.66 | 3.68 |
| 2-1/2″ | 65 | 2.875 | 2.469 | 0.203 | 5.8 | 5.85 |
| 3″ | 80 | 3.5 | 3.068 | 0.216 | 7.58 | 7.68 |
| 3-1/2″ | 90 | 4 | 3.548 | 0.226 | 9.12 | 9.27 |
| 4″ | 100 | 4.5 | 4.026 | 0.237 | 10.8 | 10.92 |
| 5″ | 125 | 5.563 | 5.047 | 0.258 | 14.63 | 14.9 |
| 6″ | 150 | 6.625 | 6.065 | 0.28 | 18.99 | 19.34 |
| 8″ | 200 | 8.625 | 7.981 | 0.322 | 28.58 | 29.35 |
| 10″ | 250 | 10.75 | 10.02 | 0.365 | 40.52 | 41.49 |
| 12″ | 300 | 12.75 | 12 | 0.375 | 49.61 | 51.28 |
Extra Heavy – Schedule 80 Pipe Dimensions in MM
| NPS Designator | DN Designator | Outside Diameter | Inside Diameter | Wall Thickness | Nominal Weight (Mass) per unit Length | |
|---|---|---|---|---|---|---|
| (mm) | (mm) | (mm) | Plain End (kg/m) | Threads & Couplings (kg/m | ||
| 1/8″ | 6 | 10.3 | 5.5 | 2.41 | 0.47 | 0.46 |
| 1/4″ | 8 | 13.7 | 7.7 | 3.02 | 0.8 | 0.8 |
| 3/8″ | 10 | 17.1 | 10.7 | 3.2 | 1.1 | 1.1 |
| 1/2″ | 15 | 21.3 | 13.9 | 3.73 | 1.62 | 1.62 |
| 3/4″ | 20 | 26.7 | 18.8 | 3.91 | 2.2 | 2.21 |
| 1″ | 25 | 33.4 | 24.3 | 4.55 | 3.24 | 3.25 |
| 1-1/4″ | 32 | 42.2 | 32.5 | 4.85 | 4.47 | 4.49 |
| 1-1/2″ | 40 | 48.3 | 38.1 | 5.08 | 5.41 | 5.39 |
| 2″ | 50 | 60.3 | 49.3 | 5.54 | 7.48 | 7.55 |
| 2-1/2″ | 65 | 73 | 59 | 7.01 | 11.41 | 11.52 |
| 3″ | 80 | 88.9 | 73.7 | 7.62 | 15.27 | 15.39 |
| 3-1/2″ | 90 | 101.6 | 85.4 | 8.08 | 18.63 | 18.82 |
| 4″ | 100 | 114.3 | 97.2 | 8.56 | 22.32 | 22.6 |
| 5″ | 125 | 141.3 | 122.3 | 9.52 | 30.94 | 31.42 |
| 6″ | 150 | 168.3 | 146.3 | 10.97 | 42.56 | 43.05 |
| 8″ | 200 | 219.1 | 193.7 | 12.7 | 64.64 | 65.41 |
Extra Heavy – Schedule 80 Pipe Dimensions in Inches
| NPS Designator | DN Designator | Outside Diameter | Inside Diameter | Wall Thickness | Nominal Weight (Mass) per unit Length | |
|---|---|---|---|---|---|---|
| (Inches) | (Inches) | (Inches) | Plain End (lb/ft) | Threads & Couplings (lb/ft) | ||
| 1/8″ | 6 | 0.405 | 0.215 | 0.095 | 0.31 | 0.32 |
| 1/4″ | 8 | 0.54 | 0.302 | 0.119 | 0.54 | 0.54 |
| 3/8″ | 10 | 0.675 | 0.423 | 0.126 | 0.74 | 0.74 |
| 1/2″ | 15 | 0.84 | 0.549 | 0.147 | 1.09 | 1.09 |
| 3/4″ | 20 | 1.05 | 0.742 | 0.154 | 1.48 | 1.48 |
| 1″ | 25 | 1.315 | 0.957 | 0.179 | 2.17 | 2.19 |
| 1-1/4″ | 32 | 1.66 | 1.278 | 0.191 | 3 | 3.03 |
| 1-1/2″ | 40 | 1.9 | 1.5 | 0.2 | 3.63 | 3.65 |
| 2″ | 50 | 2.375 | 1.939 | 0.218 | 5.03 | 5.08 |
| 2-1/2″ | 65 | 2.875 | 2.323 | 0.276 | 7.67 | 7.75 |
| 3″ | 80 | 3.5 | 2.9 | 0.3 | 10.26 | 10.35 |
| 3-1/2″ | 90 | 4 | 3.364 | 0.318 | 12.52 | 12.67 |
| 4″ | 100 | 4.5 | 3.826 | 0.337 | 15 | 15.2 |
| 5″ | 125 | 5.563 | 4.813 | 0.375 | 20.8 | 21.04 |
| 6″ | 150 | 6.625 | 5.761 | 0.432 | 28.6 | 28.88 |
| 8″ | 200 | 8.625 | 7.625 | 0.5 | 43.43 | 44 |
Unlock New Skills with Our Best Selling Online Courses
Permissible Variations – ASTM A53 Grades A and B Pipe
| Permissible Variations for ASTM A53 Grades A and B Pipe | |||
|---|---|---|---|
| O.D. | Over | Under | |
| Outside Diameter | NPS 1/8 to 1-1/2 DN 6 to 40 | 1/64″ (0.4mm) | 1/64″ (0.4mm) |
| NPS 2 and up DN 50 and up | 1% | 1% | |
| Wall Thickness at Any Point | ——– | 12.50% | |
| Weight | 10% | 10% | |
Are You Piping Components Master?
- Learn about pipe size and schedule
- Learn about Pipe Manufacturing


